Guitar Lessons & Tips
Steve offers general guitar instruction at all levels to those who reside
in or near Boston, MA .
He has over 25 years continuous teaching experience and competitive rates. Specialties include finger-style picking, blues,
slide guitar, Latin and African guitar styles)
For more specific info, please contact : steve@stevehurl.com
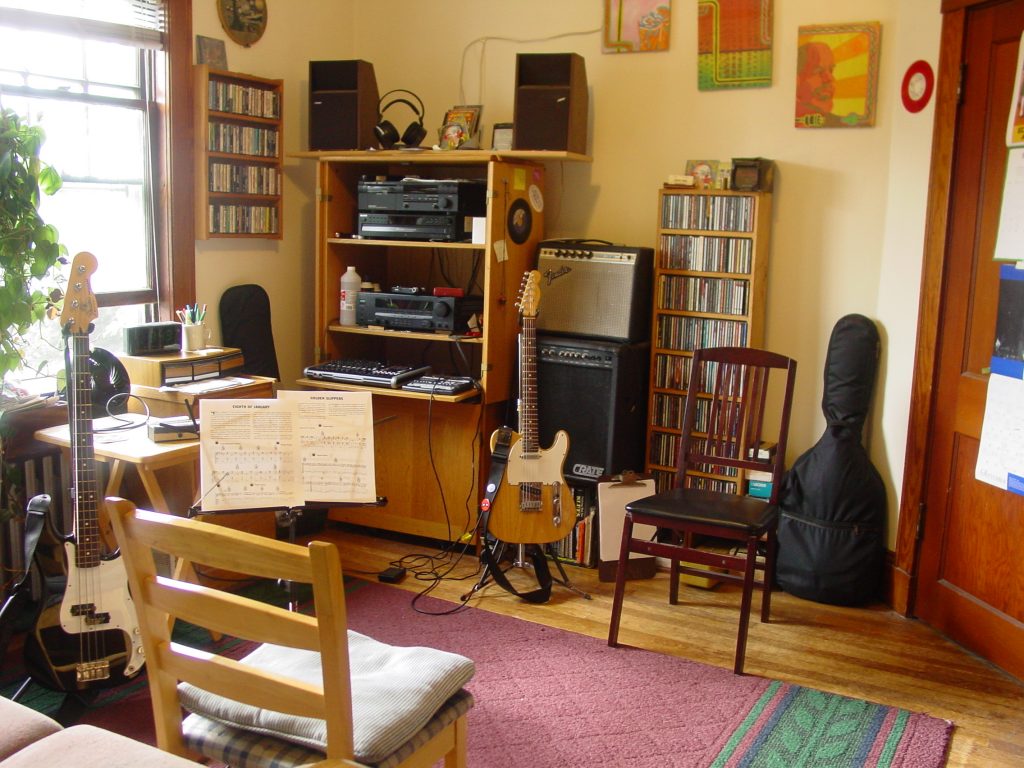
The music room, where much of the magic happens…..
note the natural lighting (daytime only)
G u i t a r T i p s
Chords for the Puerto Rican Cuatro
(scroll down past this section for many guitar tips)
The cuatro is a 10-string, double-coursed plucked instrument with a body size between that of a mandolin and a classical guitar. The strings are steel, or silver-wound, and it has frets (I’m thankful for that). It looks like this:

In October 2011, I acquired a student-grade version (which needed some work to improve its intonation—thanks to Mark Herbert of Guitar Works, a great Boston-based guitar tech and luthier, for his typically excellent work on my cuatro). So, I mostly play the instrument as a hobby, and I don’t know much of what the experts know. I have been looking for info on the web, but I haven’t found much more than brief history, and how the cuatro is tuned:
Low to high: Notes: B b – E e – A A – D D – G G Strings: 10 9 8 7 6 5 4 3 2 1(lower case letters denote octaves, otherwise, the string courses are tuned in unison)
Seeing no chord diagrams for the instrument on the web, I decided I should post some of what I’ve figured out. The chords diagrammed below are hand-drawn, so please excuse their appearance—the dimensions are not quite professionally rendered, but they will get the point across. These are NOT the only ways to form these common chords. In fact, a few fingering and voicing options exist with most of the chord grips, even at the neck locations presented. They are just meant to get the novice player started. Although full chords are played, the cuatro is rarely strummed like a guitar. More typically, rhythmically-oriented lines ( guajeos ) are played by working out of the chord grips. The approach is similar to playing syncopated arpeggios on a guitar. Scale-based runs are usually interspersed around the chord-based arpeggios patterns.
Listen to Puerto Rican bomba music and the traditional styles from eastern Cuba for good insight into how riffs are constructed. Also, check out the music of Yomo Toro on YouTube– he was a real master of the cuatro. Of course, his music goes well beyond the basics, so you may be a little confused, but certainly delighted.
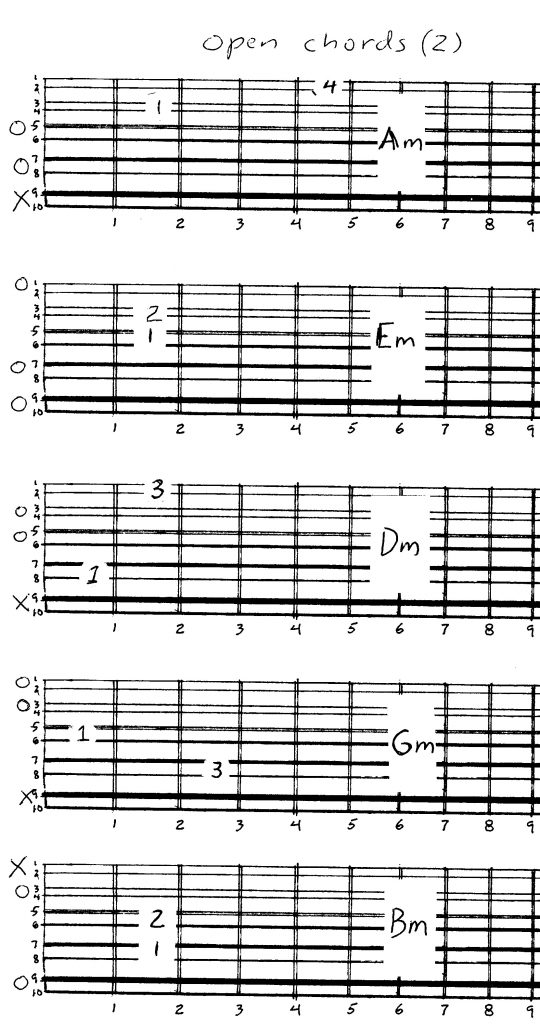
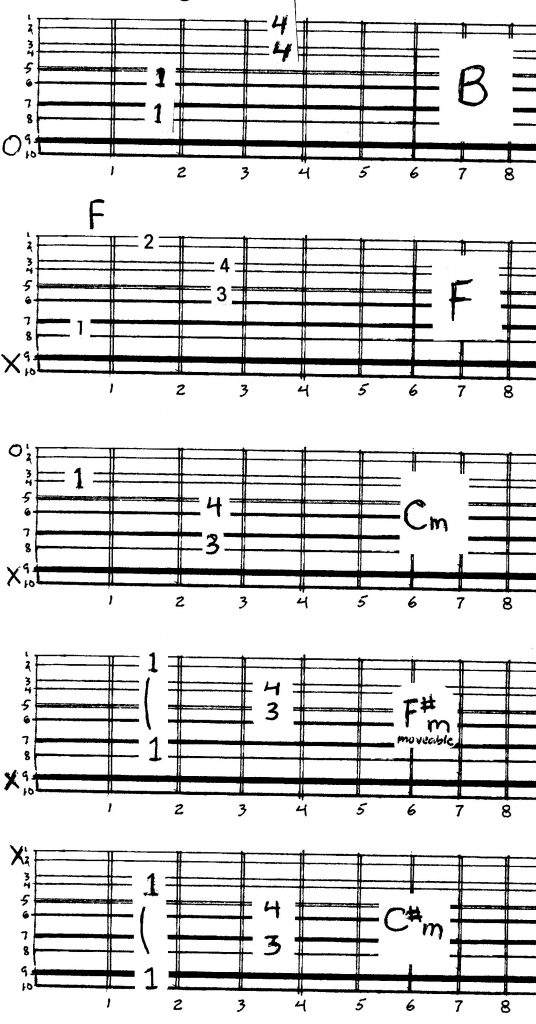
Here are some common cuatro chords: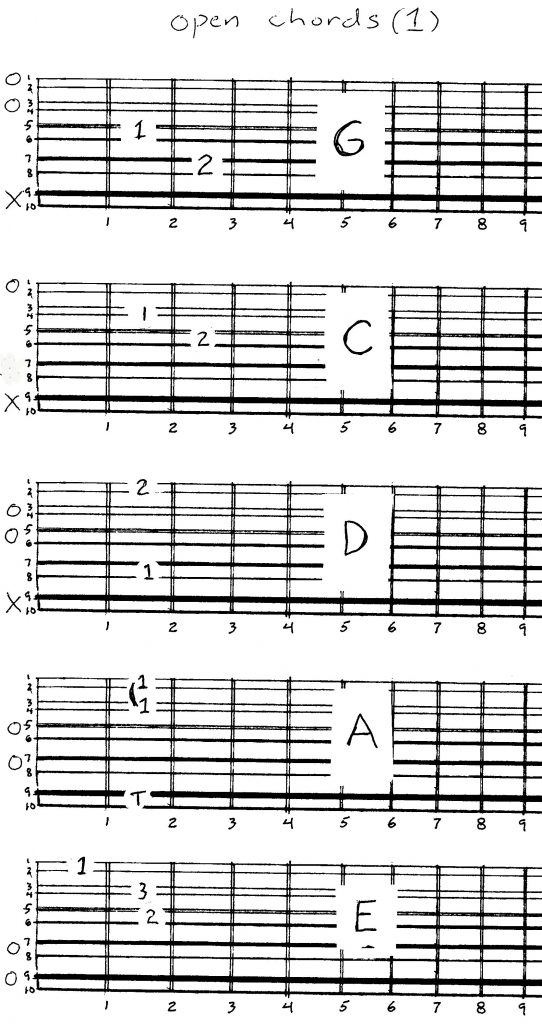
How to find a good guitar teacher….
To save $$$, try to deal locally. Ideally, you’d want direct communication with the instructor. There are web sites that offer to hook you up with local teachers, but you will pay between 50% and 80% MORE for your lesson, and the teacher will not be so well paid, because of the “middleman” who takes a big chunk of the lesson fee.
Look for “guitar lesson” ads on local “community bulletin boards,” either the electronic version, or actual neighborhood bulletin boards with paper posters tacked onto them (if they still exist in your community). Maybe a local classified ad.
Your local music store will likely hook you up, but in my experience as both a teacher and a student, the instructor who is in business for him/herself is more motivated, is offering a better rate, and keeps more of the $$$, so is likely to continue with the business. Music stores typically have a high turnover rate with teachers because they don’t offer them such a good deal.
Any music teacher who knows what (s)he’s doing can set up a teaching room that is more pleasant to spend time in than the cheap drywall, windowless, badly ventilated, unheated room in the back of the music store. Ask your potential instructor about the teaching space– maybe they can email a photo to you.
More teaching experience = higher lesson rate, but only to a point. In my view, teaching experience is actually more important than holding a music degree (which is still a great asset), because the teacher doesn’t only have to know music, (s)he has to explain music and coach the student through the processes, and experience really helps make the teacher more efficient.
You might try asking for a free trial lesson. Not all teachers will do this, but some give a free introductory lesson of a shorter duration, and you’d get a sense of the teacher’s style and set-up.
Know a little about your musical goals and tastes. You stand a better chance of finding the right guitar teacher if you can specifically ask about styles and songs you’d like to learn.
Ask about the teacher’s performing experience as well. If they use the theory and techniques they teach on their own gigs, they are bound to be a little sharper and fresher than someone who teaches but has not played out for years. Hear a clip or watch a video or two of the instructor performing. And remember, the instructor doesn’t necessarily have to be in a particular type of band in order to teach you what you need to know, unless you have specific “stage set-up” questions that only a seasoned pro within a specific genre could answer.
A common question, “How long will it take me to learn how to….?” is actually NOT very illuminating, because so much depends on the student’s commitment to practice, age, and possibly even the condition of the student’s guitar. You’ll get an answer, but it will necessarily be somewhat hypothetical. A good open-ended question might be to ask the instructor to describe one or two “success stories”: students who reached their goals and who acquired skills.
Some teachers use a “method” as a big part of their teaching style, others help you with material you bring in. Most can do a combination of both. What approach do YOU think you would prefer?
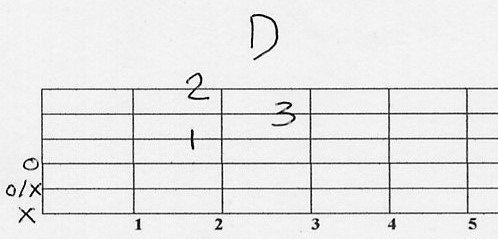
Fingers 1 and 2 line up vertically along the 2nd fret. A bent wrist helps to accomplish that line-up. But the 3rd finger (placed on the 2nd string) has to assume a sideways slant in order to reach the 3rd fret WITHOUT touching the first string. Of course, it takes work to get the 3rd finger to angle correctly, because the position of both the wrist and fingers 1 and 2 don’t faciliate the 3rd finger position. You get used to it, THEN (somewhat later) it begins to feel natural.
The whole range of finger position challenges are solved by patiently practicisng the best angles that your fingers can assume. There’s no device to buy– you just work it out. For more general advice on this subject, see the “Spread & Curve” entry at the bottom of this page.
BASIC FINGER-STYLE TECHNIQUE
I happen to teach a “3-fingers + thumb” approach. Many players use “2-fingers + thumb.”
The cardinal rule: Divide up the work between the individual digits, so that no one finger is doing too much of the plucking. You may not always need all 3 fingers to play a part, but the thumb is nearly always in use.
Like the “home keys” in typing, there is a general assignment of strings to fingers,
as below:
“Bass” strings: 6E played by thumb (noted as “P” for Spanish “pulgar”)
5A “
4D “
“Treble” strings: 3G played by index finger (noted as “I” for “indecio”)
2B played by middle finger (“M” for “medio”)
1E played by ring finger (“A” for “andular”)
The above assignment works most of the time, however, fingers may sometimes cluster on the “bass” strings for particular patterns. This is especially true if there is a general logic to the finger placement. For example, a picking pattern may not involve the 1st string at all. If so, then the fingers may be “reassigned” to pluck lower strings.
The player should usually avoid using the middle finger (M) on the 1st string, or the index finger (I) on the 2nd string when adopting the “3 finger” approach. Although there are “specialty” moves that break the rules, for development purposes, we assign one finger to each treble string, and the thumb plays the bass strings.
Strums may be produced by a downward stroke of a finger nail across the strings (sharper, brighter tone), or by a downward stroke of the thumb, followed by an upward finger stroke (rounded, mellow tone). Wearers of thumb and finger picks will have to use the latter technique.
Here’s a simple pattern to get you started. All notes are valued as 8th notes. Try using an A or Am chord:
Count: 1 + 2 + 3 + 4 + (8th notes)
String: 5 2 4 3 5 2 4 3 play strings 5 & 1 together on beat 1
1
Some moveable “small form” chord fingerings:
Some of these (examples 2 and 6) look very much like the basic open position
chords from which they are all derived.
The rest of the fingerings are modified so they can move up and down the strings, providing a new major or minor small (i.e.: 3 note) chord at every location along the 1st, 2nd and 3rd strings. The examples below make use of open bass strings to broaden
the overall sound. As you study these diagrams, make careful note of the fret positions described below the guitar neck diagram.
ex. 1: D ( D on 3rd string )
1|——1–|———-|———-|–
2|———|———–|—-–4-|–
3|———|———–|——-3|–
4|———|———–|———-|–0
5|———|———–|———-|–0orX
6|———|———–|———-|–X
frets: 5 6 7
ex.2: E ( E on 2nd string )
1|———|———1-|———-|–
2|———|———–|——–3|–
3|———|———2|———|–
4|———|———–|———-|–X
5|———|———–|———-|–X
6|———|———–|———-|–0
frets: 3 4 5
ex. 3: A ( A on 1st string )
1 |———|——–1-|———-|–
2|———|——–1-|———-|–
3|———|———–|——-2–|–
4|———|———–|———-|–X
5|———|———–|———-|–0
6|———|———–|———-|–0orX
frets: 4 5 6
ex. 4: Dm ( D on 3rd string )
1|——–1-|———-|———-|–
2|———|——–2-|———-|–
3|———|———-|——–3-|–
4|———|———-|———-|–O
5|———|———-|———-|–O or X
6|———|———-|———-|–X
frets: 5 6 7
ex. 5: Am ( A on 1st string )
1 |——-1-|————|———|–
2|——-1-|————|———|–
3|——-1-|————|———|–
4|———|————|——-3-|–
5|———|————|———|– O
6|———|————|———|– O or X
frets: 5 6 7
ex .6: Em ( E on 2nd string )
1|——-1-|———–|———|–
2|———|———–|——-3|–
3|———|——–2-|———|-
4|———|———–|———|– X
5|———|———–|———|– X
6|———|———–|———|– O
frets: 3 4 5
These forms are good starting points for inventing riffs. They are often used with rhythmic arpeggio pattern-picking to create 2nd guitar parts over the basic strummed chords. Any Beatles record has several good examples of small chord use, but they are used to great effect in all western music genres. There are many other small forms that suggest other chords, but these are the six basic formations for the upper 3 strings, and they give you three locations along the fretboard for each major and each minor chord. They are slide-able and bend-able. They can be broken down into 2-note combinations, for which the fingerings can be further modified. Practice them until each fingering is memorized. An important goal is to gain the ability to name each small-form chord at each fretboard location.
“I Ain’t Got Time to Practice.”
Maybe you really don’t have any free time….but maybe you have a few minutes of down time here and there that could be spent doing something repetitive that can train the fingers, at least, if not the mind. It’s hard to be a creative genius if you only play 10-15 minutes a day. But, while you anticipate having more creative time to explore your instrument, you can keep yourself more ready to create by playing through simple,
well-memorized finger exercises that improve or at least maintain your dexterity.
Here are a few areas that the beginner or intermediate guitarist can work on, almost mindlessly:
1] alternate picking exercises: examine how well you hold the pick; go for a steady, flowing pick attack and don’t worry about speed– only timing and clarity. I know guitarists who watch sports on TV with guitar in hand, and they do string-skipping alternate picking exercises while the ads are on.
2] learn a new chord: try the back pages of your chord book. Work on one fingering repeatedly, until thoroughly memorized. You can’t use it if it ain’t memorized.
3] learn a new scale pattern: remember the one-fret-per-finger rule as you do this. Repeat, repeat, repeat….
4] work out a new riff: related to #3 above
5] take care of any “remedial” knowledge: Have you never memorized the notes on the open strings? Can you close your eyes and slide a finger from the 5th to the 7th fret? Accurately? Do you know on which string the “root” bass note of each common chord is located? Can you locate octave notes on different strings? It’s like cramming for a one-question test…. you can handle that.
Of course, doing all of the above with a mindful attitude, paying close attention to detail is absolutely the best way to go. But if it’s a question of chipping away at the challenges OR doing nothing about them, I’d say keep at it any way you can manage, and you will maintain a higher level of skill which can be brought to bear whenever the pace of life slacks off.
M a y b e d o n ‘ t c o p y g u i t a r i s t s o n c o m m e r c i a l v i d e o s
Rock stars posing… yeah– they look cool. But, remember, that’s the main goal of those videos– to look good while pretending to play. So they wear the guitar well below the navel, and strum from the elbow– it’s nicely visual, but it impairs your reach and your ability to control the dynamics (differing volume levels) of your playing. Of course, if you’re spending big $$$ on a video, and your music has no dynamics anyway, then the rock star posturing may be the way to go.
But if you are trying to improve your strumming coordination, or your chord formations, then wearing the guitar at a low altitude may hinder your progress, because you have to bend your wrist too severely to reach the neck, and that will often compromise your leverage. Also, if you’re trying for the advanced strum patterns heard in funk/soul jazz-rock whatever, you need to control your strums from the wrist muscles, NOT from the elbow. That will be difficult to do if you wear the guitar too low– you can’t approach the strings with the best angle if you’re wearing the guitar on your hip. But raise that guitar up a bit, and you’ll be able to reach all the strings more easily with both hands.
Listen to recordings by James Brown (Jimmy Nolen on guitar– a pioneer of funk strumming), Booker T & the MGs (w/Steve Cropper, whose touch and timing are a joy to hear), and if you dig around, you can find recordings that include guitarist Avi Bortnick. I saw him once with John Scofield (check the CD “Up All Night“) and his rhythm playing was so exquisitely funky that he repeatedly stole my attention away from Sco’s amazing guitar solos, and that ain’t easy to do. These are 3 players who really help to set the standard for world-class rhythm guitar playing. If you want to sound that good, you have to adopt a playing stance that allows to you fully develop those all-important wrist muscles.
S P A C E A N D T I M E
Take a short musical phrase, just a few notes, and work that phrase into several different phrases by changing the time value of some of the notes and varying where the accented beats fall. Same notes, same sequence, but with time value and accent-note variations. If you quickly fall into playing exact repetitions, try a considerable variation in your chosen tempo (i.e.: much slower or much faster than where you started). The idea is to create several variations. Of course, proceed into a real solo, with new note choices eventually. By manipulating timing and dynamics, you achieve a fresher approach to soloing than you would by merely spewing out lots of new note combinations. Most of us would agree that emotional content is greatly enhanced by effectively timing the delivery of notes and phrases. So if you spend some conscious practice time re-working the timing and dynamic aspects of your melodies and riffs, you improve your intuitive sense of how to improvise with a strong command of dynamics and timing. A true cliche: the silences around your notes are just as important as the notes themselves. You can say it in 20 notes or 2000 notes, but at least you’ll appreciate the difference between a dense and a spacious approach.
Hey You! What Are You Listening To?
I know some serious guitar pickers who are working hard at their craft. You hear ’em, and you know that they put in a lot of time improving their playing. Unfortunately, many of them sound like a complete copy of their hero(es) ‘cuz that’s all they listen to. You know: blues players who cop all of Stevie Ray Vaughn’s licks, a jazz player who borrows too much of Pat Metheny’s tone and compositional sense, or a folk strummer who’s trying to sound just like Woody Gutherie. Great chops, no originality. You could argue that the market rewards those who render the same old stuff, but the greats didn’t get that way by copying others’ acts. Could be that what we all need to do is search outside of our own chosen area of musical expertise, and listen to someone making good music in a style that’s not close to our own–– perhaps even someone who plays a different instrument!
The usual recommendation is to listen to horn players for a greater sense of melody– after all, they are melodic, not chordal instruments (though horn sections are a great source of inspiration when you’re trying to find a sequence of small-form chords that will work together melodically). I’ve learned a few moves from listening to piano players. I never can get all the notes that they are able to hit, but I have picked up on that layered sound that two-handed keyboard players achieve combining bass and treble notes, and taken that approach into my finger-style playing. Imagine a blues player learning from the melody of a contemporary folk song. Imagine a metal player grooving better after listening to some Latin styles. Imagine a folk finger-picker getting new harmony ideas from listening to classic jazz. Imagine (American) country guitarists twisting some African guitar licks around until they fit into their well-rehearsed style. Imagine….
S p r e a d & C u r v e !
Yeah, you know all about it….And it is kind of remedial, but even the pros flub some notes ‘cuz our fingers just land too flat or too far from the fret once in awhile. It’s a problem esp. with chord fingerings– it’s that B bass note on the 5th string you don’t get when you finger an open G chord, or worse, the open G 3rd string that doesn’t ring in the middle of your open C chord– brings everybody at the campfire down
Well, our fingers bend in 3 places– remember that 3rd knuckle right below the fingertip. Curve it more, and you usually lessen the surface area that a given finger covers on the fretboard. That makes it less likely that you’ll bump into strings in an unwanted fashion.
Also, notice if your fingers really stretch out to just-behind-the-fret (esp. the 4th finger). Play a few scales, slowly. If you’re landing 1/4″ to 1/8″ away from the intended fret, your notes are gonna buzz pretty often and you’ll probably lose sustain. Try to do more finger-reaching than hand shifting if you’re operating within a 4-fret span. It might really matter if you’re hitting what you intend to hit– it ain’t like old times when the novelty of high-volume guitar antics sort of made up for a bad hit/miss ratio. Nowadays even your mother can tell if you’re playing sloppily. So don’t let the dear lady down, esp. if she bought you your first guitar.

Oh yeah, and change your %$#*! strings once in a while!
….and wash yer hands between eating ribs and pickin’ up your sufferin’ guitar.